It is coming to that time of year again when we might need to consider using electric fencing for horses as a temporary means of keeping our senior animals out of certain areas and within others.
Spring and early summer grass is around the corner. Metabolic disorders, including laminitis, can be exacerbated by unfettered access to pasture. We know many older equines are susceptible to these conditions.
Restriction of spring grazing can encompass various strategies such as confining anials to dry lots or grass-free or grass-sparse loafing areas. We also can use track systems, strip grazing, careful rotational grazing systems, and others. Each of these systems might employ temporary, portable electric fencing. Such fencing is generally safe, effective, adaptable, and (relatively) cheap.
What Is Electric Fencing?
It is a sensory/psychological barrier rather than a physical one. Contact with an electric fence delivers a brief—but harmless—electric shock. It creates a sufficiently unpleasant sensation to deter most animals from future contact.
Electric fencing for horses can be permanent or temporary. In this article, we are focusing on the latter.
Temporary Electric Fencing
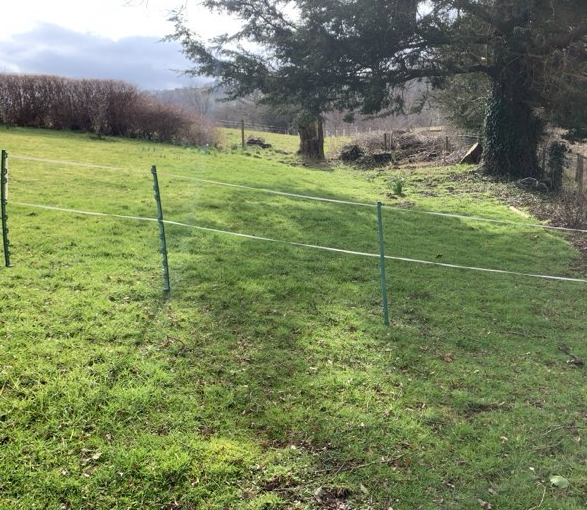
This type of electric fencing for horses typically consists of thin plastic posts supporting single or multiple strands of easily seen, conductive fencing tape or rope (Figure 1). Attach the tape/rope to an energiser unit or a ‘charger.’ That delivers the current. There is an earth rod (grounding rod) that completes the circuit when a horse touches the fence.
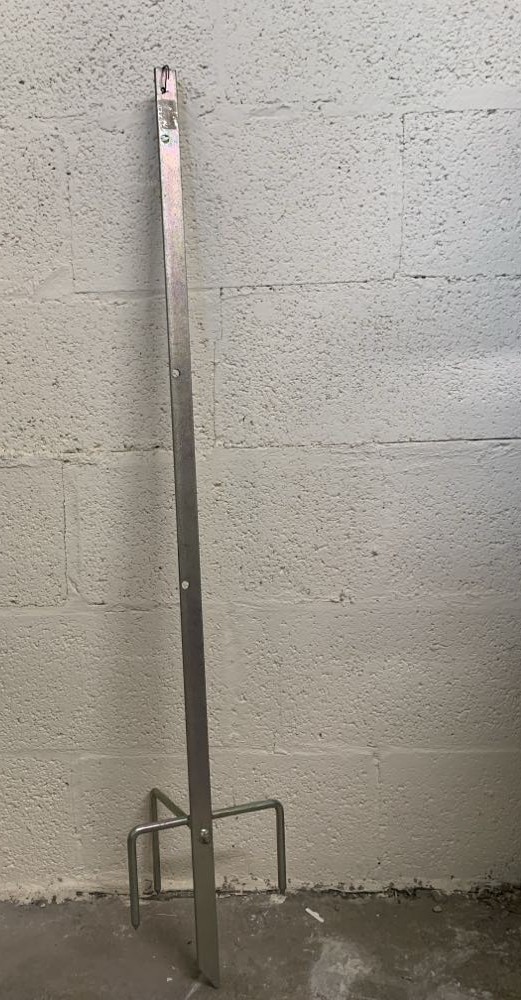
Electric fence posts for equines are commonly 90-155cm (35.5-61 inches) high. There are a number of slots/hooks at different heights along the post. Use those to thread the fence tape/rope. This allows construction of fences to suit individual requirements. Use posts with extra ‘feet’ at the bottom at corners for added stability/strength (Figure 2).
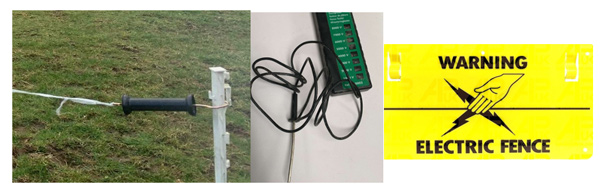
Join lengths of tape/rope by appropriate connectors. These can also act as ‘break points’ should an animal become entangled in a fence (Figure 3). Knotting two lengths of tape/rope together reduces fence performance. Insulated ‘gate handles’ (Figure 4) are useful at entry/exit points.

Powering Your Fence
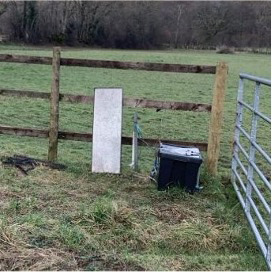
Power energisers by your property’s public electricity, solar chargers, or batteries. Batteries need frequent replacement or charging. Some energisers have integral solar panels, but some of the smaller units might not be effective year round.
Separate, larger solar panels that charge leisure batteries (kept with the energiser in a sturdy, weatherproof box) often work well throughout the year (Figures 5 and 6). Solar panels, energisers, and batteries can be attractive to thieves, so they should ideally be kept out of direct sight as much as possible.

Electric Fencing for Horses: Do’s and Don’ts
The following tips can help you properly use electric fencing for your equids.
Do use enough fence posts.
Setting posts 2 meters (about 6.5 feet) apart is recommended. This supports taut tape/rope and helps to provide a strong fence. Should tape/rope become dislodged from a post, it will still be supported by the neighbouring posts. Wider inter-post intervals can weaken fences, predispose to ‘sagging’, and potentially invite attention from determined escapees!
Do alternate the direction that the slots/hooks on adjacent fence posts face.
If, for example, high winds blow the tape/rope off one post, it will be saved by the posts on either side (Figure 1b).
Do adjust the height of your fence according to the size, guile, and jumping prowess of the horse/pony it is trying to manage.
Use taller posts, if necessary. Sometimes you need at least 3 strands of fencing at 120-150 cm (59 inches), 90 cm (35.5 inches), and 60 cm (24 inches) high. A strand at 90 cm with another at 50-60 cm (Figure 4) is often sufficient for shorter posts. For Shetlands, minis, or those that put their necks under the fence and uproot fence posts, another strand at 30 cm can help prevent this. Single-strand fences at 90 cm might suffice for experienced horses that are highly respectful of electric fencing.
Do use corner posts.
These confer stability and strength to electric fences (Figure 2).
Do use adequate galvanised steel (or iron) earthing/grounding rods.
An earth connector from the energiser is attached to the rod. To be effective, rods must be in contact with moist soil. For short fences, the metal spike at the end of a plastic electric fence post might provide sufficient ‘earthing.’ For larger fences, a bigger rod will be required. The rod must be protected from horses trampling it. For example, site it behind a permanent fence or underneath a weighed/pegged down inverted barrel/tub. You can cut a slit in the tub through which the connector to the energiser can pass.
Do use connectors.
Use connectors between separate (but not continuous) strands on multi-strand fences, so each strand carries current. Also use connectors when joining two lengths of tape/rope (Figure 3).
Do warn the public.
Make sure to put warning signs on your electric fence to prevent accidental human contact. If your electric fence borders a public highway/right of way, warning signs are legally required in the UK. Signs at the beginning, end, and at 50m (164-foot) intervals along the fence are usually sufficient (Figure 4).
Do introduce naϊve animals to your fence under supervision.
Make sure to allow enough space for an animal’s initial (sometimes rapid) retreat from meeting an electric fence for the first time.
Do prevent vegetation or other poor conductors contacting the fence.
If weeds or sticks touch your electric fence, it will ‘short’, reducing efficacy. Where tall vegetation risks contact with the fence, strim (weedeat) or cut it back. Also be aware that if tape/rope droops down it can touch the ground or other fencing and reduce conductivity.
Do check your fence patency and battery strength regularly.
It is good to check your fence and battery daily, if possible. Use a fence tester to make it easy (Figure 4).
Do site water buckets away from electric fencing.
This will prevent inadvertent electric shocks to the animal. If the fence must be in close proximity to permanent drinkers/waterers, insulate that portion of the fence that runs near the water source. Passing the fence tape/rope through lengths of hosepipe can provide effective insulation.
Do ensure that any headcollars/grazing muzzles cannot get caught in the fence.
Cover buckles or clips with a neoprene or sheepskin sleeve to help in this regard. Be aware that muzzles and headcollars/halters are not good conductors and can reduce the efficacy of the fence.
Do not let ends of fencing tape touch the ground or other fences.
Keep tape ends tidy (a reel is useful) and off the ground.
Do not use electric ‘string.’
This type of electric fence is not very visible to horses. If you must use it, place plastic or aluminum foil ‘stringers’ hanging from the fence at regular intervals to make it easily visible to an animal.
Do not use neck covers on rugs/blankets or don’t rug at all, if possible.
Blankets and neck covers can dull the strength of the electric pulse. This is also true of ponies with overly long/thick forelocks and manes.
Don’t immediately discard posts with bent ‘spikes.’
You often can straighten damaged posts in a vice or in a gate end!
Final Words
Properly set up electric fencing is usually a highly effective means of containing horses. However, if they become frightened or are chased, they might run through the fence.
For that reason, it is recommended that electric fencing for horses is used to section off areas within a permanently fenced outer perimeter.
Further Reading
- Dry Lot for a PSSM Horse. MySeniorHorse.com
- My Senior Horse Podcast: Housing Seniors. Heather Lewis. MySeniorHorse.com
- Feeding a Horse Herd to Avoid Fights. Dr. Nancy Loving. MySeniorHorse.com